Warning: this is not about Hallowe'en
but
but
Hallowe'en is a great time to 'get a handle on'
Broomstick Crochet!
 |
| My first scarf of broomstick crochet is on the blocking board! [August 2016] |
Anytime is a great time to try broomstick crochet!
Over the years, I have played around with broomstick techniques but had never made a proper project with it until I attended the 2016 Adelaide Stitches & Craft Fair in May.
Like my Striped Tricot Scarf (22 October 2016) this first rainbow scarf was also a "Workshop Scarf" using the fabulous colours of Katia's 'Darling' superwash merino blend as supplied by Melbourne-based yarn supplier and workshop sponsor, Lola Lovegrove.
 |
| Getting started on my broomstick 'workshop' scarf |
Participants purchased a kit made up of printed pattern instructions, a 15 mm wooden knitting needle (the 'broomstick'), a 3 mm anodised aluminium crochet hook and two skeins of Katia 'Darling' in a choice of colours. Of course, I could not go past the bright, happy rainbow colours, could I?
The colours I choose do influence the amount of pleasure I get from a project. If they are colours I love, it helps me to persevere with any tricky patches in the process. I chose colour 201, lot 68521.
 |
| Take a good look at these amazing colours. [Katia 'Darling' superwash merino, colour 201] |
The workshop was conducted by Kim Sharman-Smith who was ever patient and calm.
Her friendly and relaxed attitude helped to settle any nerves or excitement about embarking on a new skill.
Her friendly and relaxed attitude helped to settle any nerves or excitement about embarking on a new skill.
 |
| A sample of broomstick lace that I made years ago. (8 ply acrylic yarn) |
Everyone's different colours gave us all a learning experience: darker colours made it harder to see the stitches; lighter, solid colours emphasised the stitch definition and texture; my variegated colours made it easier to discern the different strands as I worked each stitch. We got to know each other a little bit as people explained their reasons for their colour choices and what those colours meant for them.
I was a 'slow poke' with my work. Like all projects, this one started with a foundation chain. I wanted to make a stretchy one that combines the foundation chain with (Aus/UK) double crochet stitches all in the one motion but I was tired and couldn't quite remember whether I was getting it right or not and kept losing count so I spent a bit of time trying and ripping back and trying again.
I could not get my tension even because, after using wide handled hooks for so long, my hands took time to adjust to the narrow metal hook.
To make matters worse, immediately before the workshop, I had met some friends for morning tea and enjoyed a rare coffee (I avoid coffee as part of my pain management strategy). Because I don't drink coffee often, when I do, I like to have a 'proper coffee' - "quality over quantity"! Consequently, the body was unaccustomed to the caffeine and by the time I arrived at the workshop, my hands were all shaky which made it difficult to handle my hook accurately! It was quite frustrating really.
 |
| It takes some time to get used to handling a 'broomstick' as well as a crochet hook, yarn and project! |
Never mind, it is all a learning experience. I also learned that the yarn had a woolly 'halo' which made it prone to sticking to itself and an inordinate amount of time was spent dealing with my self-induced knots caused by reckless ripping. 'S-l-o-w-l-y' is the way to approach any unravelling with Katia 'Darling'.
Attendance at a workshop is a great reminder of what it is like to be a beginner and I hope it will help me to keep my blog posts relevant to readers with a range of skill levels.
Cast your mind back to when you first learned to crochet or knit. How much fiddling around did you need before you found a comfortable and efficient way to hold the hook and yarn? Everyone is different so it is worth taking the time to experiment with different holds and methods until you find the one that works for you.
Cast your mind back to when you first learned to crochet or knit. How much fiddling around did you need before you found a comfortable and efficient way to hold the hook and yarn? Everyone is different so it is worth taking the time to experiment with different holds and methods until you find the one that works for you.
Once into the rhythm, broomstick crochet is very quick. No wonder it has also been called "Jiffy Lace" because each row is finished 'in a jiffy'! It is addictive too. Like ripple crochet, completion of each small section invites, no, begs one to continue for 'one more row'!
Broomstick crochet has a couple of things in common with tricot (Tunisian crochet)–each row is worked in two passes where a row of loops are lifted onto the 'broomstick' (large knitting needle) and then worked off again using the crochet hook; i.e. cast on and then cast off. The right side of the work is always facing.
Here's a basic description of how I do it:
- After a row of regular crochet, place the active loop (the loop on the crochet hook) onto the 'broomstick'. I end up with the broomstick in my left hand and the crochet hook in my right. I feed my yarn with my left hand.
- Insert the crochet hook into the next stitch and draw up a loop. Place that loop onto the broomstick. Repeat across the row until there is an entire row of loops on the broomstick.
- Use the crochet hook to work the loops off the broomstick in groups. In the case of the rainbow scarf, I am working in groups of 4 loops. Slide the loops closer to the point of the broomstick until the crochet hook can be inserted under the next 4 loops. Use the crochet hook to lift the four loops off the broomstick and onto the shaft of the crochet hook. Be careful that no other loops fall off the broomstick!
- Keeping all 4 loops on the crochet hook at the same height, yarn round hook, pull yarn through all 4 broomstick loops at once and make a chain stitch. This will 'lock' the height of the broomstick loops and keep them together as a group. This 'locking stitch' is only necessary at the beginning of the cast off row.
- Now there will be a hole in the middle of the first group of 4 broomstick loops. Insert the crochet hook into that hole to make 4 dc stitches across the top of the 4 broomstick loops and voila! The first broomstick lace group is complete!
- Continue across the row, working 4 dc stitches into each subsequent group of 4 broomstick loops until all the loops are off the broomstick. After the last group is done, there will be 1 active loop on the crochet hook ready to go back onto the broomstick for the next row of loops.
 |
| "This broomstick needle looks good enough to chew!" says Max bunny. |
It takes a little while to get used to holding the broomstick and hook. Every person will find their own way of managing it.
Holding the broomstick between your legs leaves your hands free. Some people place the broomstick under one arm to hold it firmly. The broomstick can be wedged between the arm of a chair and your thigh; as long as the broomstick is held securely, that's all that matters!
I still don't have a 'set' way of holding my broomstick. It depends on the yarn and the size of the broomstick. I mostly hold the broomstick in my left hand, supporting the end against my body or the furniture. It has been most comfortable for me to have the blunt end of the broomstick propped up on an armrest while I handle the pointy end with my left hand and the crochet hook with my right.
 |
| What a messy bottom edge! That will not do for a scarf end. |
Back at the workshop, it didn't take long to find an even tension and the results were pleasing until I discovered the wriggly, uneven tension of the foundation chain and early rows. I had succumbed to using a basic foundation chain and my shaky hands had created a very uneven result.
According to the pattern instructions, the foundation chain would become one of the short ends of the scarf. My chain edge was in no state to be on show like that.
- Problem: untidy, uneven foundation chain edge.
- Solution: do not use the foundation chain as an edge but as a central spine. Create the scarf by working each end outwards from either side of the central spine. It won't matter if it looks messy because no one will see it at the back of your neck!
 |
| A very uneven green foundation chain on my first broomstick scarf. Look at how it wiggles and is wider than the other rows. The section above the foundation was worked first. The second skein was joined to the underside and can be seen in the bottom half of the picture. |
Another discovery–the foundation chain was wider than the broomstick rows. Nothing would fix it but that's okay because there were other rows with uneven lengths due to it being my first effort. It didn't matter, I kept this scarf for myself to wear. I just love the way the colours fell across the rows and no one will be able to see the imperfections when it is around my neck.
- Problem: ordinary foundation chain is wider than the broomstick rows.
- Solution: use a stretchy foundation double crochet row instead.
 |
| That foundation double crochet row (right) looks so much neater, doesn't it? Left: First scarf / ordinary chain stitch foundation; Right: Second scarf / foundation double crochet row. It's amazing what a little practice can do! |
Broomstick lace rows have a different tension to ordinary crochet stitched rows such as a row of double crochet. It is important to find the right combination of broomstick and crochet hook sizes in relation to the yarn weight. Fortunately, the pattern from Lola Lovegrove had already done that hard work for me.
 |
| A close up of the wrong side of the scarf. When broomstick loops are worked under both loops of a dc stitch, the dc rows are pushed to the wrong side to create ridges. |
- Problem: inserting the hook into both top loops of the double crochet stitches causes raised ridges on the wrong side of the broomstick lace.
- Solution: insert hook into the top back loops only of the double crochet stitches.
 |
| A view of the ridges that appear on the reverse (wrong) side of the broomstick lace fabric when the hook is inserted under two top loops of a double crochet row. Compare the pictures below. |
 |
| The reverse (wrong) side of the first scarf after inserting the hook into the top back loops only of the double crochet stitches. The fabric is flatter and looks neater. |
The Lola Lovegrove pattern instructions were for a plain broomstick scarf with straight edges.
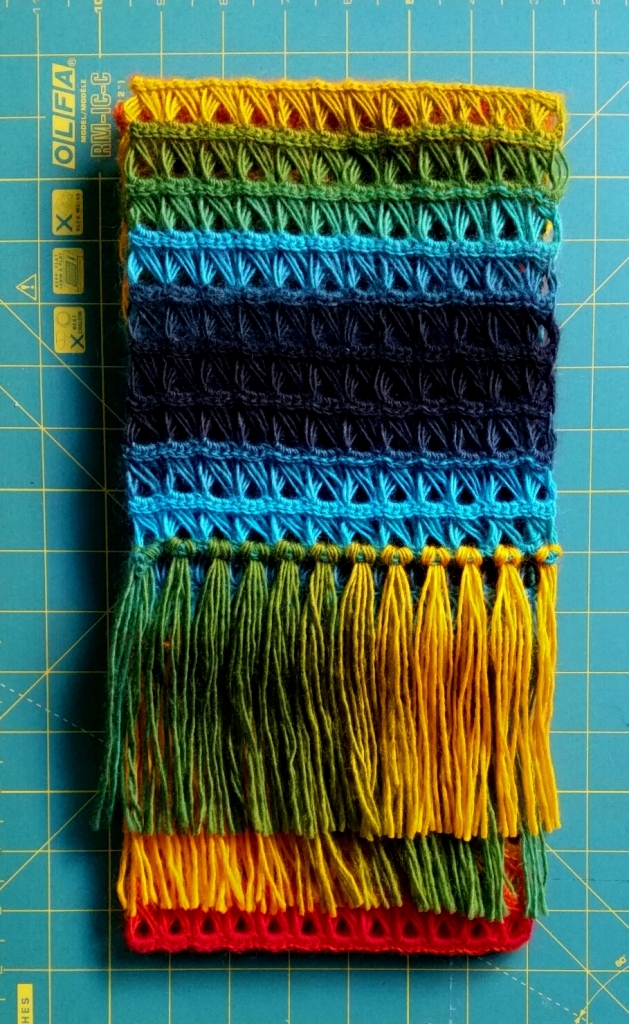
Naturally, I had to finish my versions with fringes!
 |
| First Broomstick Rainbow Scarf complete with fringe. All tagged to share at the Maker Faire ADL. "This one is MINE!" |
 |
| All trimmed! Rainbow Broomstick No. 2 "Love the Green & Gold" made by Jodiebodie [October 2016] This photograph shows the reverse side of the broomstick lace after the hook was worked into back loops only of dc stitches. "This one is PERFECT!" |
I had other adventures and discoveries along the way with these scarves but they will be subjects for other days. Let's just say, "To be continued …"
Meanwhile, if you are celebrating Hallowe'en, be sure to wear a crocheted scarf to keep away the chills, especially if you plan to ride on your broomstick!
Happy Hallowe'en!
Do you celebrate Hallowe'en?
Do you have favourite Hallowe'en crochet patterns?
Do tell in a comment below!
Links & Resources
Katia Yarns: Fil Katia, S.A.,Av. Catalunya, s/n - 08296 Castellbell i el Vilar (Barcelona), Spain: http://www.katia.com
- Katia 'Darling' colours: http://www.katia.com/EN/yarns-autumn-winter-darling.html?idLana=darling&lng=EN
Maxxybunny. Yes, Max now has his own Instagram page after much nagging from a certain friend: https://www.instagram.com/maxxybunny/
Ravelry Project Pages (Ravatar: Jodiebodie):
- "Broomstick Workshop Scarf", May-August 2016: http://www.ravelry.com/projects/Jodiebodie/broomstick-workshop-scarf
- "Rainbow Broomstick Scarf", August-October 2016: http://www.ravelry.com/projects/Jodiebodie/rainbow-broomstick-scarf
Further Reading
Chan, Doris, Crochet Lace Innovations: 20 dazzling designs in broomstick, hairpin, tunisian and exploded lace, 1st edn., ISBN 978-0-307-46382-1, Potter Craft (www.pottercraft.com), imprint of Crown Publishing Group (www.crownpublishing.com), Random House Inc., New York, USA, 2010.
Gardner, Sue [editor], A–Z of Crochet, 1st edn. reprint, ISBN 978-09775476-3-0, Country Bumpkin Publications (www.countrybumpkin.com.au), 315 Unley Road, Malvern SA 5061, Australia, 2008.
Reader's Digest, Reader's Digest Complete Guide to Needlecraft, 1st edn., ISBN 0-909486-78-6, Reader's Digest Services Pty Limited, 26–32 Waterloo Street, Surry Hills NSW 2010, Sydney, Australia, 1980.
Turner, Pauline, How to Crochet: the definitive crochet course complete with step-by-step techniques, stitch libraries and projects for your home and family, ISBN 1-85585-827-4, Collins & Brown Ltd. London 2001.
Walters, James & Cosh, Sylvia, The Harmony Guide to Crochet Stitches, 1st edn. 2nd reprint, ISBN 07111-0028-4, Lyric Books Limited, Mill Hill, London NW7, England 1986
Pattern Examples from Other Sources
Chan, Doris, "Chamomile Cardigan", Interweave Crochet, Spring 2011, USA: http://www.ravelry.com/patterns/library/chamomile-cardigan
Daehlin, Lisa, "Hairpin and Broomstick Wrap", Designer Knitting Crochet 2013, USA: http://www.ravelry.com/patterns/library/27-hairpin-and-broomstick-wrap
Hanratty, Jill, "Green Chai Cardi", Interweave Crochet, Fall 2011, USA: http://www.ravelry.com/patterns/library/green-chai-cardi
Hooton, Karen E., "Whimsy Necklace" and "Blossom Hairclips", Interweave Crochet, Spring 2013, USA: http://www.ravelry.com/patterns/library/whimsy-necklace
Howell, Vickie, "Glamp Wrap", Interweave Crochet, Summer 2014, USA: http://www.ravelry.com/patterns/library/glamp-wrap
McCall Pattern Company, "Broomstick Lace Afghan", McCall's Super Book of Afghans, New York, USA, 1978.
Omdahl, Kristen, "Cables and Lace Broomstick Hat", Crochet So Fine: Exquisite Designs with Fine Yarns, Interweave Publishing, USA 2010; 8 Free Crochet Hat Patterns: Crochet Hats with Crochet Me, e-book, 2011 crochetme.com USA: http://www.ravelry.com/patterns/library/cables-and-lace-broomstick-hat
Pullen, Kate, "Broomstick Lace Capelet", Interweave Crochet, Fall 2007; 5 Free Crochet Poncho Patterns, e-book, November 2015, crochetme.com, Interweave USA: http://www.ravelry.com/patterns/library/broomstick-lace-capelet
Robarge, Natasha, "Free Spirit Tunic", Interweave Crochet, Summer 2014, USA: http://www.ravelry.com/patterns/library/free-spirit-tunic
Strohm, Kristen Hein, 'Fritillary Scarf", Inside Crochet, Issue 20, August 2011, UK: http://www.ravelry.com/patterns/library/fritillary-scarf
Webber, Kath, "Woodstock Waistcoat", Inside Crochet, Issue 80, July 2016, UK: www.insidecrochet.co.uk
Related Posts on Lupey Loops
"Broomstick Rainbow Finished for You", 10 June 2017: http://lupeyloops.blogspot.com.au/2017/06/broomstick-rainbow-finished-for-you.html
"Tricot with a Double-ended Hook (Tunisian Crochet)", 22 October 2016: http://lupeyloops.blogspot.com.au/2016/10/tricot-with-double-ended-hook-tunisian.html
Oh Jodie that is such a gorgeous, gorgeous scarf in broomstick crochet! Your photos show off the technique so well. I haven't had a go but one day hope to. I hope you are well. I am afraid I have had little time to blog or comment but have made some little crochet Halloween characters for my little granddaughter and will try to write about them Happy Halloween! xx
ReplyDeleteHi Alison,
DeleteThank you for your compliments. I have been relatively well this year so have taken on a big challenge to share my broomstick crochet at the Adelaide Maker Faire this weekend. It's been a busy time with preparations and I may have bitten off more than I can chew but that is why my blog posts have had erratic timing lately.
I saw your Happy Hallowe'en blog post - your granddaughter is a cutie and you have picked perfect patterns. I love that your Hallowe'en spiders have curlicue legs just like the curlicue fringe on my tricot scarf! Fabulous stuff, Alison. Thanks for sharing your crochet thoughts both here and on your blog. :-)
I was certainly impressed. We don't celebrate Halloween these days now that the children have grown and left.
ReplyDeleteOoh! What impressed you the most, Lorraine? I know there are many people who love Hallowe'en whether they have children or not. I find that the calendar is so full of holidays and events already, Hallowe'en is one of those in which I don't actively participate. I need to keep my stress levels down and to look after my adrenalin stores (Addison's disease - just another part of the diagnostic picture around here) so I avoid frights or upsets, even the fun ones, and need to contain my excitement about anything.
DeleteWhat sorts of things did you do with your children for Hallowe'en?
Haha, you totally tricked me with the "broomstick" title - but wow, what a pleasant surprise! I've never been game enough to tackle broomstick crochet, but if I ever do, I'm coming back here to read your tips and recommendations. What an incredibly helpful and detailed post! ^_^
ReplyDeleteHaha! I hope the detail in this post turned a 'trick' into a 'treat'!
DeleteHave fun, Jennifer! :-)
Great introduction to a beautiful niche of the craft!
ReplyDeleteThank you, Kathryn. I could have gone on a bit more but the post was so long already! There will be more occasions to elaborate on broomstick crochet.
DeleteNice crochet ♥ Happy Monday♥
ReplyDeleteGlad you like it, Summer! Pretty colours make a happy day! Do you agree?
Deletethat is a beautiful scarf, I have yet to try that stitch, you make it sound easier than I thought it was. Thank you for your instructions.
ReplyDeleteThank you, Meredith. I'm glad it sounds easy - I worry that too many words will make it sound hard. It is very easy. I will make an effort to take photos next time and post a mini tutorial. I just need to get through Maker Faire ADL and wait for the dust to settle! I'm looking forward to meeting lots of people and having an entire day dedicated to talking about crochet! :-)
DeleteThat turned out absolutely beautiful! I am impressed. Also the most lovely warming colours. Pam in Norway
ReplyDeleteThank you so much, Pam. I'm extra pleased with it so it is nice that other people also like it. Broomstick lace is the perfect application for that yarn to showcase the beautiful colours. Sending you warm wishes to ward off your autumn chill. xx
Delete